In this CORSAIR Explorer article, we will show you how to run diagnostics on your PC to make sure everything is working properly. We’ll focus on applications that can be used to test your PC's performance and stability. There are plenty of applications available to test your hardware, but we would like to point out the ones that we think you may find useful too.
Caution: Be aware, that testing your hardware with some of the tools mentioned below will put stress on the components that can reduce their lifetime. Always make sure that your cooling components like your CPU cooler and fans are in working condition and configured accordingly to adapt for excessive heat produced during the tests. Also make sure that you are using a quality power supply.
So, let’s get into it.
Caution: You will need an empty USB stick (2GB or larger) to run MEMTEST86 effectively.
For memory testing we will point out MEMTEST86 by PassMark. It’s a free tool for testing DRAM and is also available as an ISO, so you can create a bootable USB stick. Using a bootable USB stick is comfortable and ensures that testing can be performed without the need of an operating system running. We will guide you through the creation process below.
MEMTEST86 will write to and read from all the available memory blocks of the installed DRAM, checking that the process is correctly executed. If any corruption occurs, the software will detect it and notify you in real time.
Let's start with the basics:
Downloading the application and creating a bootable USB stick.
Download the latest available version of MEMTEST86
Extract the file to the folder of your choice and memorize where the folder with the extracted files is located as you will need the location later.
To create a bootable USB stick from an iso file, you'll need a second program such as Rufus / UNetbootin / ImageUSB. In our example, we'll be using Rufus.

Choose the USB Stick that you have connected to your system from the dropdown marked with the blue box in the above screenshot.
The red box lets you choose a Disk or ISO Image, Click on SELECT and navigate to the folder where you have extracted the MEMTEST86 files to and choose the disk image file. In our case here the file is called “memtest86-usb.img”.
Caution: The USB stick will be formatted, and you will lose all files it contains.
Click on Start to create a new bootable USB stick.

Once creating the USB stick has finished, it is ready to use. Before you restart your system, familiarize yourself on how to access your PCs BIOS so that you can boot from the USB stick instead of booting into your operating system. Let us show you how this can be done on our system.
You can change the boot order directly in the BIOS of your system, or often you can also force boot from the USB stick by pressing a shortcut key for the boot menu during bootup [F8 (ASUS) or F11 (MSI) or F12 (Aorus/Gigabyte), Esc or F9 can also be used on some laptops]. If you cannot find the options, please check out your motherboard’s manual that includes information on how to access the BIOS and how to change the drive boot priority.
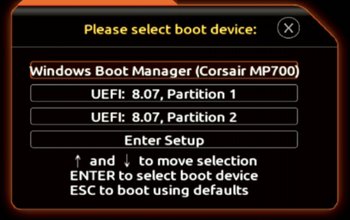
A force boot could look something like this. Here we must select the USB stick, so our system knows which drive to use to boot from. The name in our case is “UEFI 8.07 Partition 1”.
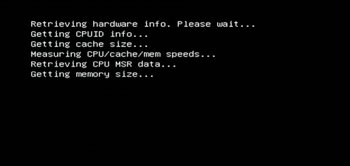
After you selected the boot device, your system will directly boot from the selected USB stick and briefly you should see this on your monitor.
The memory scan will start automatically and depending on the size and number of the installed modules can take a long time to complete. This is due to each block of memory being checked.
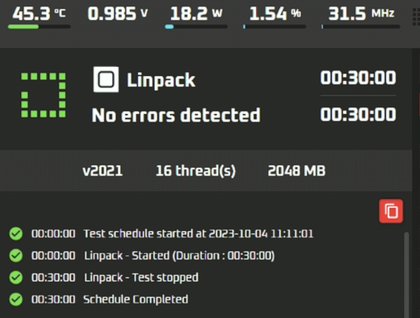
A full test will perform four passes of testing the DRAM installed, but you can choose to end the test whenever you please. Our suggestion is to at least let the application do one full pass to check if your DRAM is functioning properly. This would be a good indicator that all is working well.
Caution: Please consider, that there is a possibility of the test failing due to other reasons. Should you encounter errors while testing your CORSAIR DRAM modules, please take a picture of the results and reach out to our technical support team so that we can help you resolve the issue.
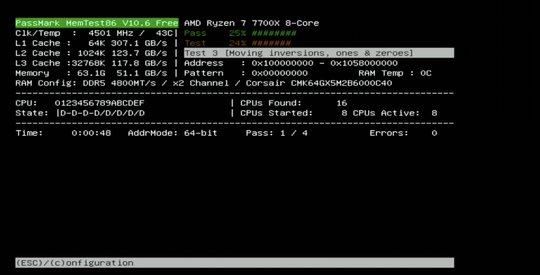


This is how the screen should look once the test completes. A passed test means that there is nothing wrong with your DRAM.
Should the test encounter any issues, they will be marked as Errors in red. If you see this screen, it is time to take out your mobile phone and to snap a picture of the results. After that you should reach out to our technical support team to further discuss what to do.
For testing your processor, your memory, and your graphics card there is a Windows application called OCCT by OCBASE. It has stability checks that also includes stress tests to make sure that your hardware is performing as intended. As these tests are very demanding on your system a failed result does not necessarily mean that there is something wrong with a component but will help to determine if your cooling solution is sufficient or not. For example, a failed test due to high processor temperatures can potentially lead to either a system crash or a failure message, but under normal workloads and while gaming you will never experience any of these issues.
You can download the application directly from the OCBASE website.
Caution: Be aware, that testing your hardware with some of the tools mentioned below will put stress on the components that can reduce their lifetime. Always make sure that your cooling components like your CPU cooler and fans are in working condition and configured accordingly to adapt for excessive heat produced during the tests. Also make sure that you are using a quality power supply.


By default, OCCT will NOT stop its tests if issues are encountered. To set up this feature if a test fails, you will need to enable this in the settings of OCCT.
Here is an example of how a temperature alert would look like if the critical temperature defined in the settings has been crossed
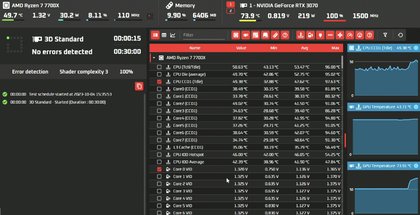
CPU tests the processor in your system as well as the memory. There are several parameters that influence the balance between the two:
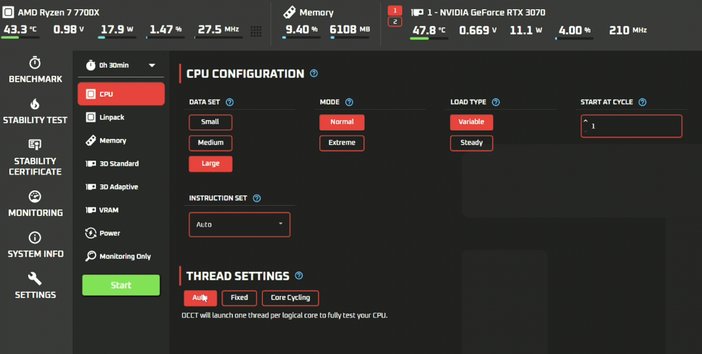
Here are the suggested options that we like to use when testing our CPU:
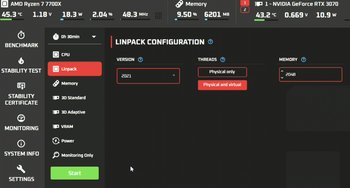

Linpack is a particularly demanding processor stress test created by Intel. You can choose the software version, the thread type (Physical or Physical + Virtual) and the amount of memory allocated to the test. You should use the default settings unless you are after testing for a specific scenario.


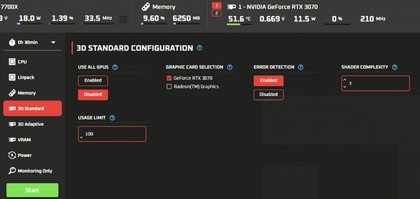
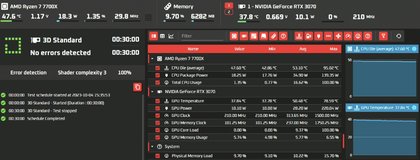
he 3D Standard option produces a heavy load on the graphics card. It's possible to select one or more graphics cards (if present), to activate error detection and the complexity of the test via the number of Shaders (a value of three is generally optimal). You can also specify the maximum percentage of the graphics card used. You should use the default settings unless you are after testing for a specific scenario.
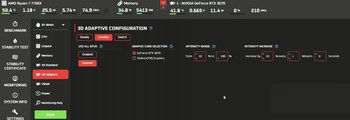
3D Adaptive stress test is based on the Unreal Engine. Tests can be run with a constant load, a variable load (incremental at the start, then varying during the test) and a switch mode for a change of state between load and rest. Each test of either Variable or Switch offers a choice of intensity which can be set as a range or actual percentage to switch in-between. We suggest you use the Variable setting unless you are after testing for a specific scenario. For the INTENSITY RANGE you should go from 10% to 100% and the INTENSITY RANGE should be increased by 10% every 1 minutes so that when you are running a 30 minute test your card will be tested three times over.

VRAM (video memory) is the stress test dedicated to the on-board memory of your graphics card. This will point out any issues with the VRAM during the test cycle.


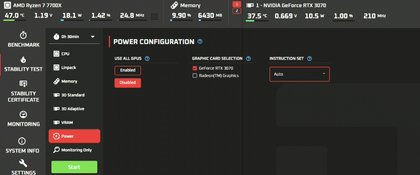
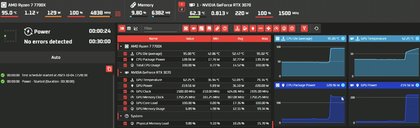
Power combines the CPU and 3D Standard tests to generate maximum power consumption on the two most power-hungry components. This test will also push your machine's cooling to the very limit. This simulates a situation that is rarely seen during regular everyday use of your PC.
Caution: We do not suggest running this test unless you are having exceptional cooling and are aware of the risks of potentially damaging your components.

PRODUCTS IN ARTICLE