CORE

PRO

ELITE

ELITE PRO

PREMIUM
ULTRA
CORSAIR BUILD KIT INTRODUCTION
Thank you for purchasing the CORSAIR BUILD KIT!
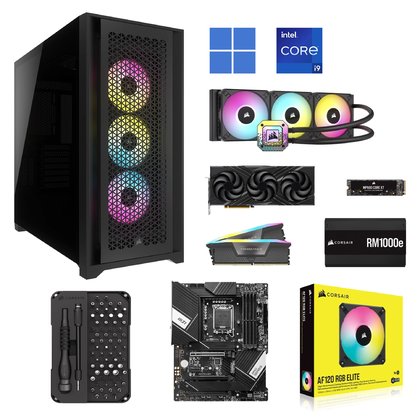
PACKAGE CONTENTS
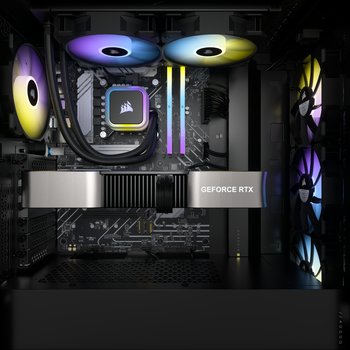
CORSAIR BUILD KIT CONTENTS
A. CORSAIR Case
B. Motherboard
C. Graphics Card
D. CPU
E. CPU Cooler
F. Memory
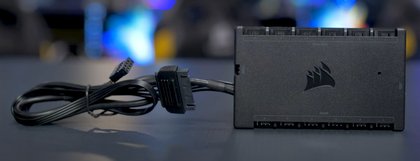
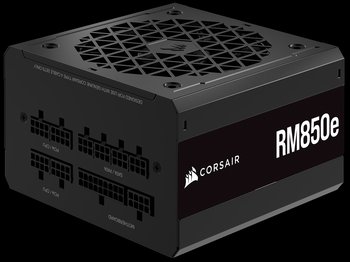
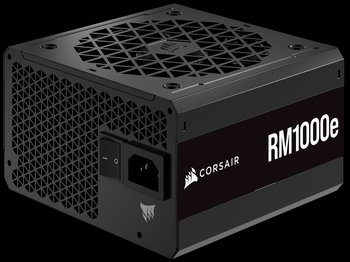
G. Power Supply
H. Storage Device
I. WiFi Card (if applicable to your Kit)
J. Fans (if applicable to your Kit)
K. Windows Activation Code
L. Tool Kit
M. Build Kit Top Sheet
** Note: Hardware component models may vary from images shown.
ASSEMBLY AND VERIFICATION
Follow along with our instructional videos to build your very own Corsair Desktop.
INTRODUCTION
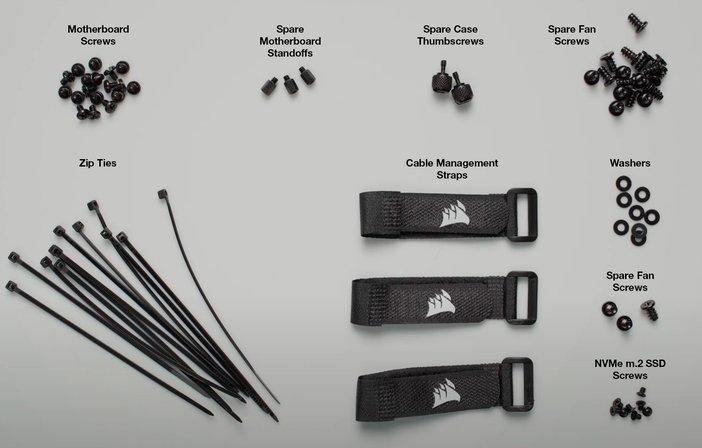
7. Organize the screws, zip ties, and Corsair straps on your flat surface. These will be used during assembly.
* Refer to the video for step-by-step instructions.
MOTHERBOARD INSTALLATION
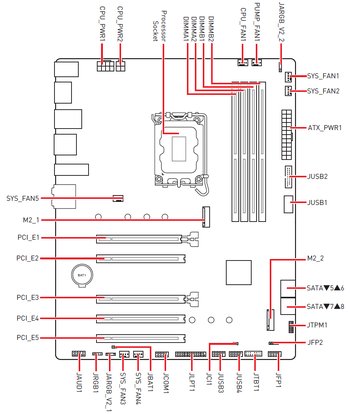
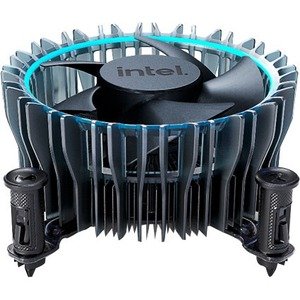
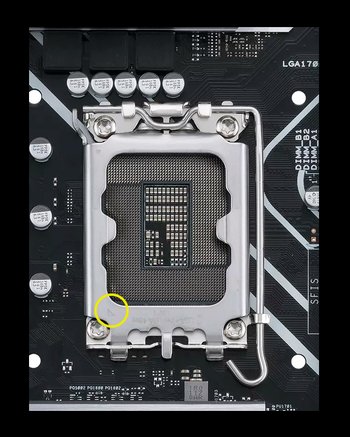
2. Unpack the CPU and install it into the motherboard. Do not remove the plastic cover protecting the CPU socket as this will pop off when the CPU is installed. To release the latch, push the latch down and out to the right to open it. To properly install the CPU, look for the small triangle that is located in the bottom left corner of the CPU, and match it with the small triangle located at the bottom left corner of the CPU socket. To close the latch, lower the latch and push down under the clip to lock it in place. Reference images below.


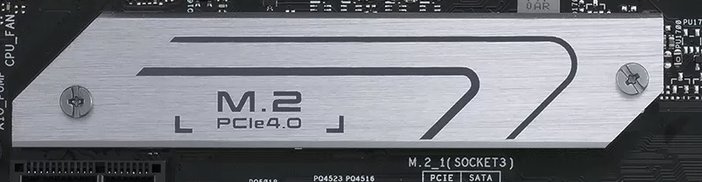
3. Remove the heatsink cover on the motherboard to install the NVMe m.2 SSD (storage device). This is located in the middle section of the motherboard. Reference image below.
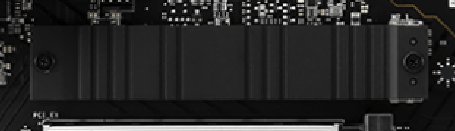
4. Locate and unpack the NVMe m.2 SSD found inside the anti-static bag. Install the NVMe m.2 SSD in the first m.2 slot located below the CPU. Secure with the provided screw.

5. Replace the heatsink cover onto the NVMe m.2 SSD (storage device).
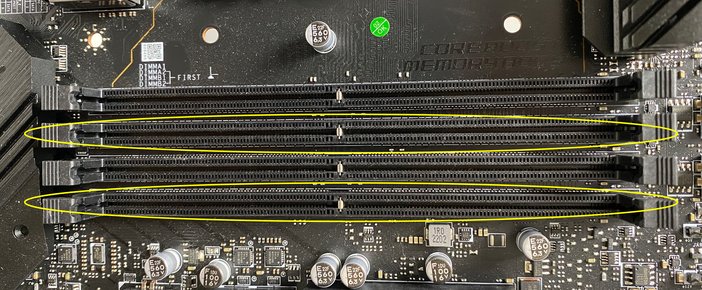
6. Unpack the memory and install the memory sticks in the second and fourth DIMM slots.


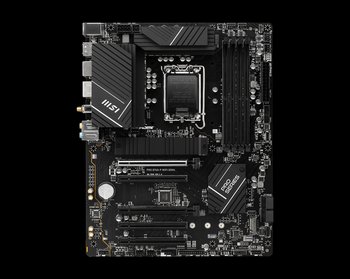
7. If your motherboard does not have the rear I/O shield pre-installed, install the rear I/O shield before installing the motherboard (reference image below). Install the motherboard into the case and secure it with the motherboard screws that came in the brown box. Tighten the screws until they are snug, but do not overtighten to avoid damaging the motherboard.
Note: There is a long standoff in the center of the case that does not require a screw to secure the motherboard.

COOLER & FAN INSTALLATION
Note: Air cooler received may vary from images shown.
2. Connect the power cable from the Air Cooler to the motherboard port called "CPU Fan".

3. Do not change the default fan orientation.
* Refer to the video for step-by-step instructions.
CABLE MANAGEMENT

USB 3.2 Header
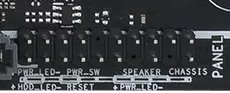
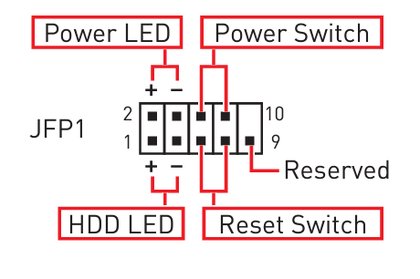
System Panel Header
USB Type-C Header

Audio Header
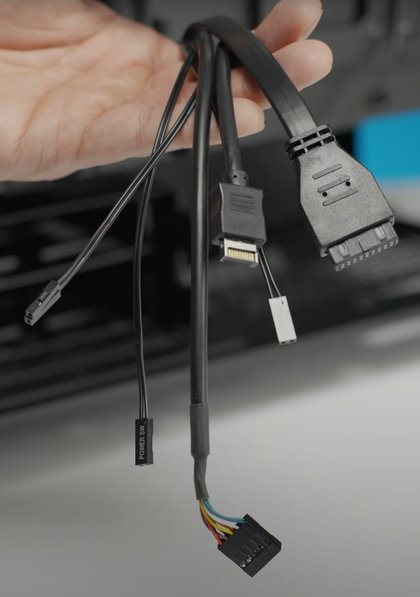
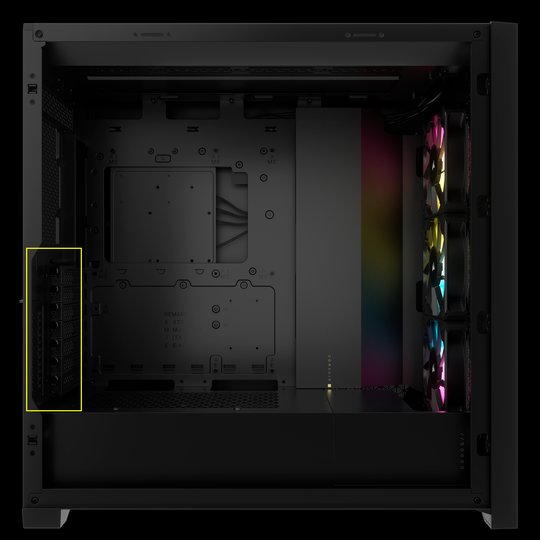
Front I/O Cables
2. Connect all the fan power cables to the motherboard and/or your liquid cooler fan headers. Route excess cables to the back side of the case.


* Refer to the video for step-by-step instructions.
GRAPHICS CARD AND POWER SUPPLY INSTALLATION
3. Retrieve the cables from your Power Supply Box labeled 24-Pin Power Cable and SATA Power Cable.

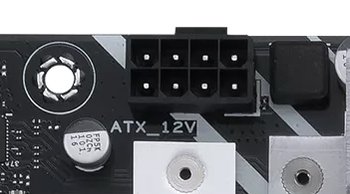
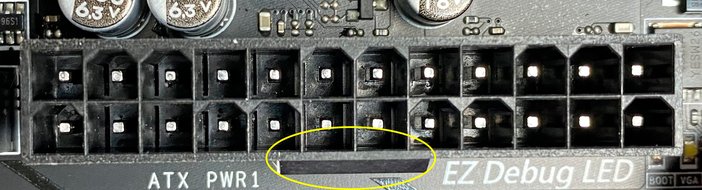
4. Connect the 24-Pin Power Cable into the motherboard (located on the right side) and route the cable towards the cable management side of the case. Confirm that the 24-Pin cable latch is secure over the 24-Pin header notch.

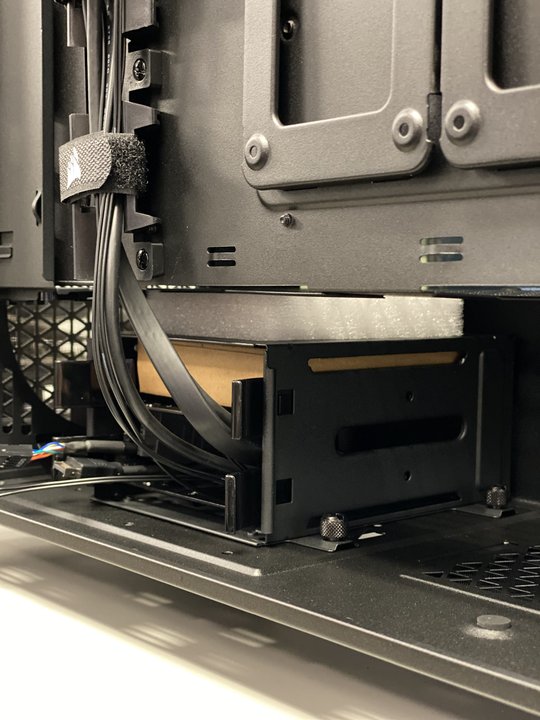
5. Remove the second and third screws and backplates from the case. This is located on the rear side of the case. If you have a 3-slot graphics card, remove the second, third, and fourth screws and backplates.

6. Unpack and remove all packaging material and protective film from the graphics card before installation.
7. Install the graphics card on the first PCIe slot on the motherboard. Secure the graphics card with the case screws that were removed in step 1 of this section.

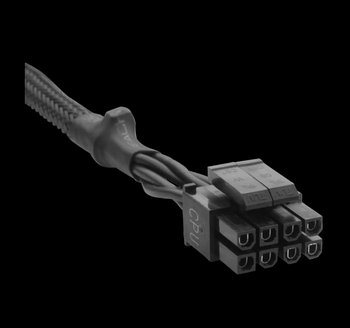
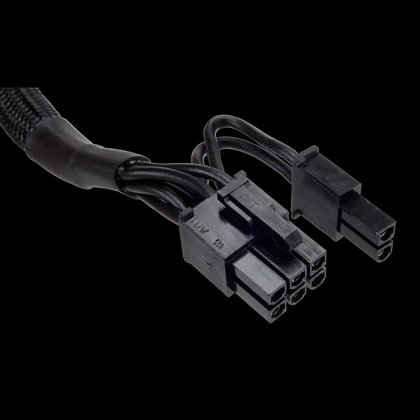
8. Grab the PCIe cable that may be pre-installed on your PSU, or retrieve the PCIe cable from your power supply box if it is a separate cable. Depending on the model of your graphics card, you may need two PCIe cables. Connect the PCIe cable to the graphics card and route the other end to the cable management side of the case. If your graphics card includes a power adapter, connect the adapter to the GPU, then connect the PCIe cable to the adapter.

PCle Cable

GPU Power Adapter
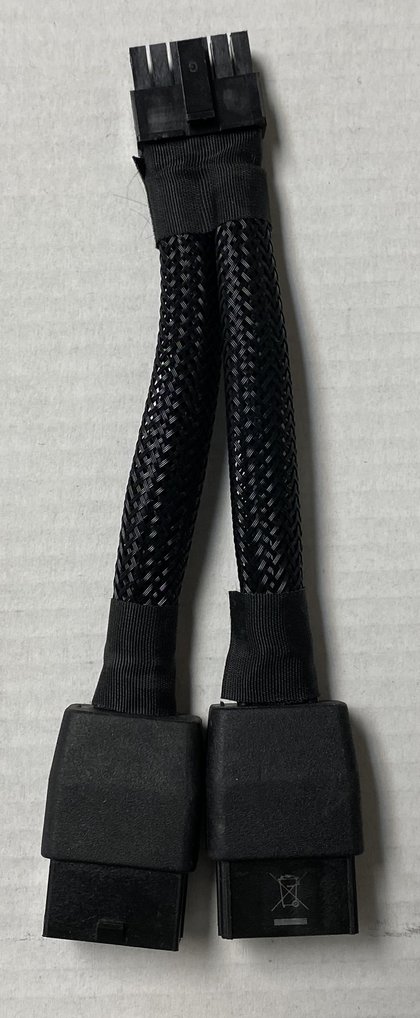
GPU Power Adapter
9. Retrieve the power supply and connect all the power supply cables that have been routed to the back side of the case.
10. Insert the power supply into the bottom section of the case on the back side and secure with the 4 screws provided. Make sure the PSU fan is facing down so it can pull cool, filtered air through the bottom cutout.

11. Connect and organize all remaining cables that have been routed to the back side of the case. Hide any excess cables you may have into the PSU chamber.
12. Retrieve the Front Panel and Filter, Tempered Glass Side Panel, Aluminum Side Panel, and Top Filter, and install them in their original locations.
* Refer to the video for step-by-step instructions.
POWER ON

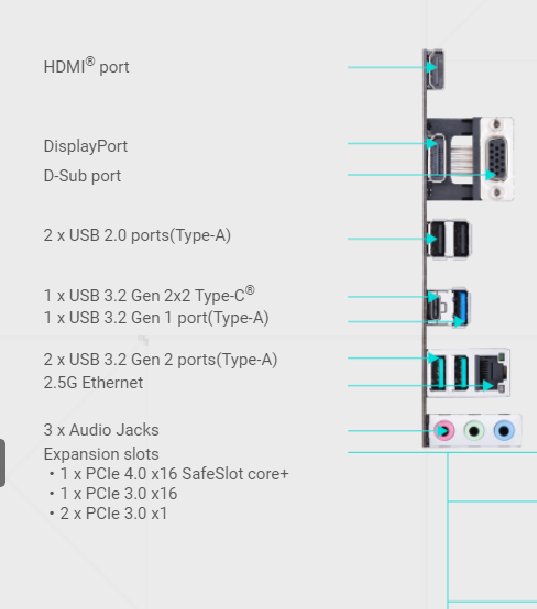
3. Connect your mouse and keyboard into the desktop via the USB ports on the motherboard located on the rear side of the case.
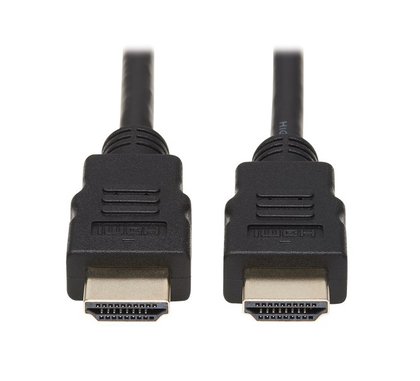
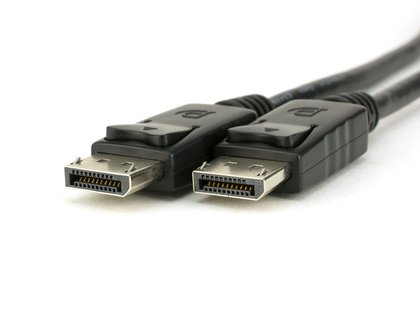
Note: Do not use the HDMI or Display Port located on the motherboard.
4. Connect the power cable into the power supply and then connect the other end of the power cable to the nearest power outlet. If you are using a surge protector, connect the power cable to the surge protector instead.
5. Turn the power supply switch on and press the power button located on the top side of the desktop.
6. Once the system goes through the initial boot process, it will load the pre-installed Windows operating system.
7. Follow along the Windows prompts to complete the user account creation.
8. When you see the Windows home screen, open the search bar and type: Activation Settings, then hit Enter.**
9. Locate and select the “Change Product Key”, then enter the Windows Activation key provided in the Corsair Build Kit.
10. Once Windows is activated, you can begin installing the drivers needed for your desktop PC. Located on the desktop, you will find a folder titled "Drivers - Open Me First". In this folder, you will locate the necessary drivers for your PC, Corsair Wallpapers, and the CORSAIR iCUE Software.


Note: No need to use the Windows Disc for activation. Windows is pre-installed.
* Refer to the video for step-by-step instructions.
ASSEMBLY AND VERIFICATION
Follow along with our instructional videos to build your very own Corsair Desktop.
INTRODUCTION
7. Organize the screws, zip ties, and Corsair straps on your flat surface. These will be used during assembly.
* Refer to the video for step-by-step instructions.
MOTHERBOARD INSTALLATION
2. Unpack the CPU and install it into the motherboard. Do not remove the plastic cover protecting the CPU socket as this will pop off when the CPU is installed. To release the latch, push the latch down and out to the right to open it. To properly install the CPU, look for the small triangle that is located in the bottom left corner of the CPU, and match it with the small triangle located at the bottom left corner of the CPU socket. To close the latch, lower the latch and push down under the clip to lock it in place. Reference images below.
3. Remove the heatsink cover on the motherboard to install the NVMe m.2 SSD (storage device). This is located in the middle section of the motherboard. Reference image below.
4. Locate and unpack the NVMe m.2 SSD found inside the anti-static bag. Install the NVMe m.2 SSD in the first m.2 slot located below the CPU. Secure with the provided screw.
5. Replace the heatsink cover onto the NVMe m.2 SSD (storage device).
6. Unpack the memory and install the memory sticks in the second and fourth DIMM slots.
7. If your motherboard does not have the rear I/O shield pre-installed, install the rear I/O shield before installing the motherboard (reference image below). Install the motherboard into the case and secure it with the motherboard screws that came in the brown box. Tighten the screws until they are snug, but do not overtighten to avoid damaging the motherboard.
Note: There is a long standoff in the center of the case that does not require a screw to secure the motherboard.
COOLER & FAN INSTALLATION
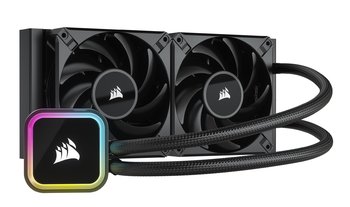

2. This liquid cooler has the Intel LGA 1700 CPU bracket pre-installed which will be needed to mount the cooler onto the CPU. Do not remove this pre-installed bracket.

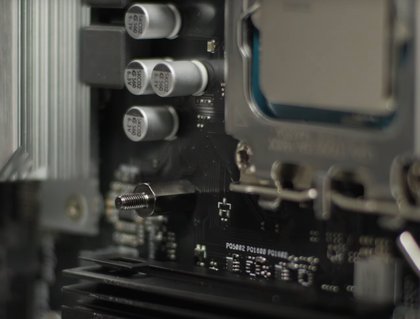
3. To mount the liquid cooler onto the CPU, you will first need to install the mounting bracket onto the backside of the motherboard. Before installing, make sure to remove the brown backing protecting the adhesive section of the bracket. Now align the four posts of the bracket with the holes located on the backside of the motherboard. Firmly press onto the bracket to ensure a proper hold. Now that the bracket is in place, install the four 1700 standoffs.


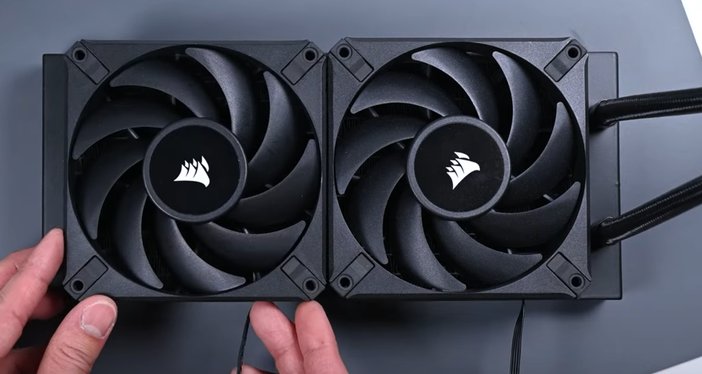
4. Grab the AIO Liquid cooler and install the two NON-RGB fans that came in the box. Align the fans with the appropriate holes located on the cooler for proper installation. To secure the fans, install 8 x long screws that were provided with the cooler.
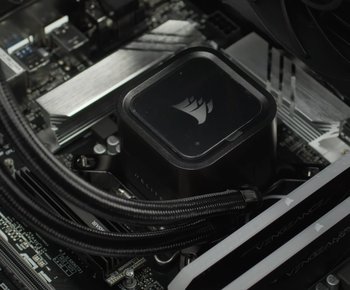
5. To install the cooler inside the case, mount the cooler above the motherboard and secure using 8 x short screws and washers. Next, install the cooler pump onto the CPU socket aligning the holes of the bracket with the previously installed standoffs. Secure the cooler pump by using the 4 provided thumb screws. Install in a crisscross pattern until the thumb screws are snug.

6. Unpack and remove all packaging from the RGB fans provided.
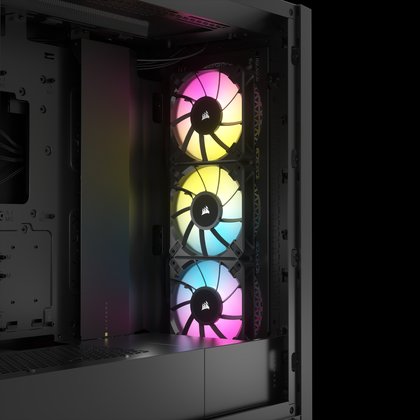
7. Remove the pre-installed fan located in the front of the case. Replace these with 3 RGB fans and install in the intake orientation (reference image below). Do not remove the pre-installed fan located in the rear.


* Refer to the video for step-by-step instructions.
CABLE MANAGEMENT
USB 3.2 Header
System Panel Header
USB Type-C Header
Audio Header
Front I/O Cables
2. Place the USB hub on the cable management side of the case, next to the hard drive cages. Connect all USB controlled devices to this hub (liquid cooler, RGB controller, etc.). Reference images below.
Note: USB Hub provided may vary.

USB Hub Variant 1
USB Hub Variant 2
3. Install the RGB hub on the cable management side towards the left side of the case. This will allow room for you to connect the RGB cables from your fans. Make sure to plug in the fan RGB cables in sequential order.


4. Install two of the fan power cables to the liquid cooler fan splitter, and then connect the remaining fan power cables to the to the chassis fan headers located across the motherboard. Route the excess cables to the cable management side of the case.


* Refer to the video for step-by-step instructions.
GRAPHICS CARD AND POWER SUPPLY INSTALLATION

3. Retrieve the cables from your Power Supply Box labeled 24-Pin Power Cable and SATA Power Cable.
4. Connect the 24-Pin Power Cable into the motherboard (located on the right side) and route the cable towards the cable management side of the case. Confirm that the 24-Pin cable latch is secure over the 24-Pin header notch.
5. Connect the SATA Power from your AIO Liquid Cooling to the SATA Power Cable. Route the SATA power cable to the back side of the case. (If applicable).
6. Remove the second and third screws and backplates from the case. This is located on the rear side of the case. If you have a 3-slot graphics card, remove the second, third, and fourth screws and backplates.
7. Unpack and remove all packaging material and protective film from the graphics card before installation.
8. Install the graphics card on the first PCIe slot on the motherboard. Secure the graphics card with the case screws that were removed in step 1 of this section.
9 Grab the PCIe cable that may be pre-installed on your PSU, or retrieve the PCIe cable from your power supply box if it is a separate cable. Depending on the model of your graphics card, you may need two PCIe cables. Connect the PCIe cable to the graphics card and route the other end to the cable management side of the case. If your graphics card includes a power adapter, connect the adapter to the GPU, then connect the PCIe cable to the adapter.
PCle Cable
GPU Power Adapter

GPU Power Adapter
10. Retrieve the power supply and connect all the power supply cables that have been routed to the back side of the case.
11. Insert the power supply into the bottom section of the case on the back side and secure with the 4 screws provided. Make sure the PSU fan is facing down so it can pull cool, filtered air through the bottom cutout.
12. Connect and organize all remaining cables that have been routed to the back side of the case. Hide any excess cables you may have into the PSU chamber.
13. Retrieve the Front Panel and Filter, Tempered Glass Side Panel, Aluminum Side Panel, and Top Filter, and install them in their original locations.
* Refer to the video for step-by-step instructions.
POWER ON
3. Connect your mouse and keyboard into the desktop via the USB ports on the motherboard located on the rear side of the case.
Note: Do not use the HDMI or Display Port located on the motherboard.
4. Connect the power cable into the power supply and then connect the other end of the power cable to the nearest power outlet. If you are using a surge protector, connect the power cable to the surge protector instead.
5. Turn the power supply switch on and press the power button located on the top side of the desktop.
6. Once the system goes through the initial boot process, it will load the pre-installed Windows operating system.
7. Follow along the Windows prompts to complete the user account creation.
8. When you see the Windows home screen, open the search bar and type: Activation Settings, then hit Enter.**
9. Locate and select the “Change Product Key”, then enter the Windows Activation key provided in the Corsair Build Kit.
10. Once Windows is activated, you can begin installing the drivers needed for your desktop PC. Located on the desktop, you will find a folder titled "Drivers - Open Me First". In this folder, you will locate the necessary drivers for your PC, Corsair Wallpapers, and the CORSAIR iCUE Software.
11. To install the drivers, double click each driver, one by one, and follow the prompts to complete installation. If prompted to restart, do so at that time, then continue the installation process.
Note: No need to use the Windows Disc for activation. Windows is pre-installed.
* Refer to the video for step-by-step instructions.
ASSEMBLY AND VERIFICATION
Follow along with our instructional videos to build your very own Corsair Desktop.
INTRODUCTION
7. Organize the screws, zip ties, and Corsair straps on your flat surface. These will be used during assembly.
* Refer to the video for step-by-step instructions.
MOTHERBOARD INSTALLATION

2. Unpack the CPU and install it into the motherboard. Do not remove the plastic cover protecting the CPU socket as this will pop off when the CPU is installed. To release the latch, push the latch down and out to the right to open it. To properly install the CPU, look for the small triangle that is located in the bottom left corner of the CPU, and match it with the small triangle located at the bottom left corner of the CPU socket. To close the latch, lower the latch and push down under the clip to lock it in place. Reference images below.
3. Remove the heatsink cover on the motherboard to install the NVMe m.2 SSD (storage device). This is located in the middle section of the motherboard. Reference image below.
4. Locate and unpack the NVMe m.2 SSD found inside the anti-static bag. Install the NVMe m.2 SSD in the first m.2 slot located below the CPU. Secure with the provided screw.
5. Replace the heatsink cover onto the NVMe m.2 SSD (storage device).
6. Unpack the memory and install the memory sticks in the second and fourth DIMM slots.
7. If your motherboard does not have the rear I/O shield pre-installed, install the rear I/O shield before installing the motherboard (reference image below). Install the motherboard into the case and secure it with the motherboard screws that came in the brown box. Tighten the screws until they are snug, but do not overtighten to avoid damaging the motherboard.
Note: There is a long standoff in the center of the case that does not require a screw to secure the motherboard.
COOLER & FAN INSTALLATION
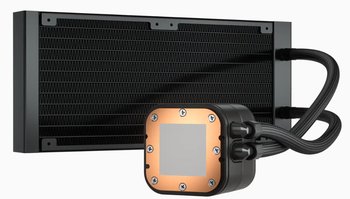
2. This liquid cooler has the Intel LGA 1700 CPU bracket pre-installed which will be needed to mount the cooler onto the CPU. Do not remove this pre-installed bracket.
3. To mount the liquid cooler onto the CPU, you will first need to install the mounting bracket onto the backside of the motherboard. Before installing, make sure to remove the brown backing protecting the adhesive section of the bracket. Now align the four posts of the bracket with the holes located on the backside of the motherboard. Firmly press onto the bracket to ensure a proper hold. Now that the bracket is in place, install the four 1700 standoffs.
4. Grab the AIO Liquid cooler and install two of the RGB fans received in your kit. Do not install the NON-RGB fans that came in the box. These will be spare fans not used in the build. Align the fans with the appropriate holes located on the cooler for proper installation. To secure the fans, install 8 x long screws that were provided with the cooler.

5. To install the cooler inside the case, mount the cooler above the motherboard and secure using 8 x short screws and washers. Next, install the cooler pump onto the CPU socket aligning the holes of the bracket with the previously installed standoffs. Secure the cooler pump by using the 4 provided thumb screws. Install in a crisscross pattern until the thumb screws are snug.
6. Unpack and remove all packaging from the RGB fans provided.
7. Remove the pre-installed fan located in the front of the case. Replace these with 3 RGB fans and install in the intake orientation (reference image below). Remove the pre-installed fan located in the rear and replace with the remaining RGB fan in the exhaust orientation (reference image below).
* Refer to the video for step-by-step instructions.
CABLE MANAGEMENT
USB 3.2 Header
System Panel Header
USB Type-C Header
Audio Header
Front I/O Cables
2. Place the USB hub on the cable management side of the case, next to the hard drive cages. Connect all USB controlled devices to this hub (liquid cooler, RGB controller, etc.). Reference images below.
Note: USB Hub provided may vary.
USB Hub Variant 1
USB Hub Variant 2
3. Install the RGB hub on the cable management side towards the left side of the case. This will allow room for you to connect the RGB cables from your fans. Make sure to plug in the fan RGB cables in sequential order.
4. Install two of the fan power cables to the liquid cooler fan splitter, and then connect the remaining fan power cables to the to the chassis fan headers located across the motherboard. Route the excess cables to the cable management side of the case.
* Refer to the video for step-by-step instructions.
GRAPHICS CARD AND POWER SUPPLY INSTALLATION

3. Retrieve the cables from your Power Supply Box labeled 24-Pin Power Cable and SATA Power Cable.
4. Connect the 24-Pin Power Cable into the motherboard (located on the right side) and route the cable towards the cable management side of the case. Confirm that the 24-Pin cable latch is secure over the 24-Pin header notch.
5. Connect the SATA Power from your AIO Liquid Cooling to the SATA Power Cable. Route the SATA power cable to the back side of the case. (If applicable).
6. Remove the second and third screws and backplates from the case. This is located on the rear side of the case. If you have a 3-slot graphics card, remove the second, third, and fourth screws and backplates.
7. Unpack and remove all packaging material and protective film from the graphics card before installation.
8. Install the graphics card on the first PCIe slot on the motherboard. Secure the graphics card with the case screws that were removed in step 1 of this section.
9. Grab the PCIe cable that may be pre-installed on your PSU, or retrieve the PCIe cable from your power supply box if it is a separate cable. Depending on the model of your graphics card, you may need two PCIe cables. Connect the PCIe cable to the graphics card and route the other end to the cable management side of the case. If your graphics card includes a power adapter, connect the adapter to the GPU, then connect the PCIe cable to the adapter.
PCle Cable
GPU Power Adapter
GPU Power Adapter
10. Retrieve the power supply and connect all the power supply cables that have been routed to the back side of the case.
11. Insert the power supply into the bottom section of the case on the back side and secure with the 4 screws provided. Make sure the PSU fan is facing down so it can pull cool, filtered air through the bottom cutout.
12. Connect and organize all remaining cables that have been routed to the back side of the case. Hide any excess cables you may have into the PSU chamber.
13. Retrieve the Front Panel and Filter, Tempered Glass Side Panel, Aluminum Side Panel, and Top Filter, and install them in their original locations.
* Refer to the video for step-by-step instructions.
POWER ON
3. Connect your mouse and keyboard into the desktop via the USB ports on the motherboard located on the rear side of the case.
Note: Do not use the HDMI or Display Port located on the motherboard.
4. Connect the power cable into the power supply and then connect the other end of the power cable to the nearest power outlet. If you are using a surge protector, connect the power cable to the surge protector instead.
5. Turn the power supply switch on and press the power button located on the top side of the desktop.
6. Once the system goes through the initial boot process, it will load the pre-installed Windows operating system.
7. Follow along the Windows prompts to complete the user account creation.
8. When you see the Windows home screen, open the search bar and type: Activation Settings, then hit Enter.**
9. Locate and select the “Change Product Key”, then enter the Windows Activation key provided in the Corsair Build Kit.
10. Once Windows is activated, you can begin installing the drivers needed for your desktop PC. Located on the desktop, you will find a folder titled "Drivers - Open Me First". In this folder, you will locate the necessary drivers for your PC, Corsair Wallpapers, and the CORSAIR iCUE Software.
11. To install the drivers, double click each driver, one by one, and follow the prompts to complete installation. If prompted to restart, do so at that time, then continue the installation process.
Note: No need to use the Windows Disc for activation. Windows is pre-installed.
* Refer to the video for step-by-step instructions.
ASSEMBLY AND VERIFICATION
Follow along with our instructional videos to build your very own Corsair Desktop.
INTRODUCTION

7. Organize the screws, zip ties, and Corsair straps on your flat surface. These will be used during assembly.
* Refer to the video for step-by-step instructions.
MOTHERBOARD INSTALLATION


2. Unpack the CPU and install it into the motherboard. Do not remove the plastic cover protecting the CPU socket as this will pop off when the CPU is installed. To release the latch, push the latch down and out to the right to open it. To properly install the CPU, look for the small triangle that is located in the bottom left corner of the CPU, and match it with the small triangle located at the bottom left corner of the CPU socket. To close the latch, lower the latch and push down under the clip to lock it in place. Reference images below.
3. Remove the heatsink cover on the motherboard to install the NVMe m.2 SSD (storage device). This is located in the middle section of the motherboard. Reference image below.

4. Locate and unpack the NVMe m.2 SSD found inside the anti-static bag. Install the NVMe m.2 SSD in the first m.2 slot located below the CPU. Secure with the provided screw.
5. Replace the heatsink cover onto the NVMe m.2 SSD (storage device) and secure with screw.
6. Unpack the memory and install the 2 memory sticks in the second and fourth DIMM slots.
7. Install the motherboard into the case and secure it with the motherboard screws that came in the brown box. Tighten the screws until they are snug, but do not overtighten to avoid damaging the motherboard.
Note: There is a long standoff in the center of the case that does not require a screw to secure the motherboard.
* Refer to video for step-by-step instructions.
COOLER & FAN INSTALLATION

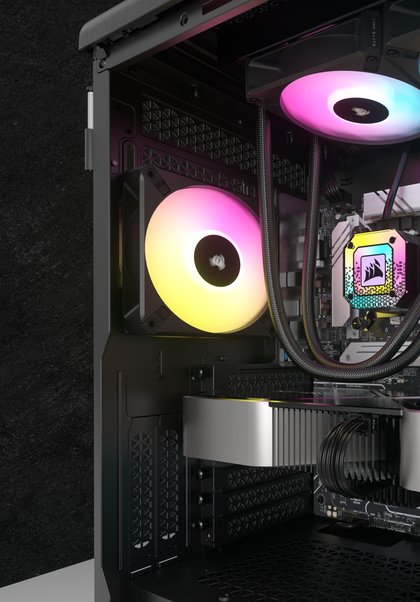
2. This liquid cooler has the Intel LGA 1700 CPU bracket pre-installed which will be needed to mount the cooler onto the CPU. Do not remove this pre-installed bracket.
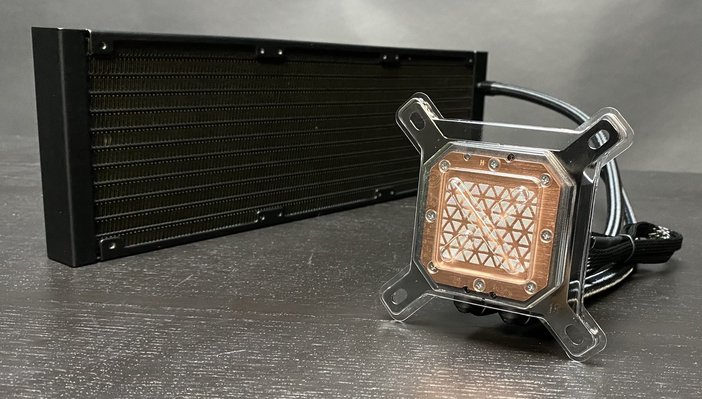
3. To mount the liquid cooler onto the CPU, you will first need to install the mounting bracket onto the backside of the motherboard. Before installing, make sure to remove the brown backing protecting the adhesive section of the bracket. Now align the four posts of the bracket with the holes located on the backside of the motherboard. Firmly press onto the bracket to ensure a proper hold. Now that the bracket is in place, install the four 1700 standoffs.


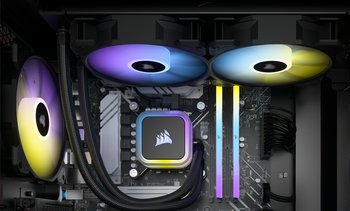
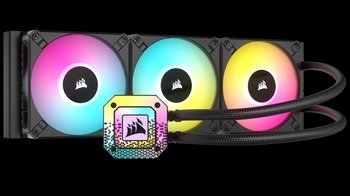
4. Grab the AIO Liquid cooler and install the three RGB fans received in your liquid cooling box. Align the fans with the appropriate holes located on the cooler for proper installation. To secure the fans, install 12x long screws that were provided with the cooler.

Fan Installation on Cooler
5. To install the cooler inside the case, mount the cooler above the motherboard and secure using 12x short screws and washers. Next, install the cooler pump onto the CPU socket aligning the holes of the bracket with the previously installed standoffs. Secure the cooler pump by using the 4 provided thumb screws. Install in a crisscross pattern until the thumb screws are snug.


6. Unpack and remove all packaging from the final RGB fan provided in the build kit.
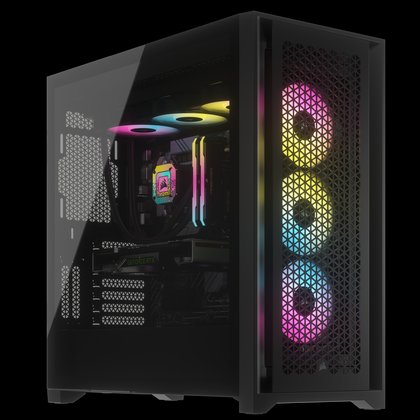
7. Install the final RGB fan in the rear of the case in the exhaust orientation (reference image below).
* Refer to video for step-by-step instructions.
CABLE MANAGEMENT


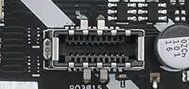
Front I/O Cables
USB 3.2 Header & USB Type-C Header

USB 2.0 Header

Audio Header
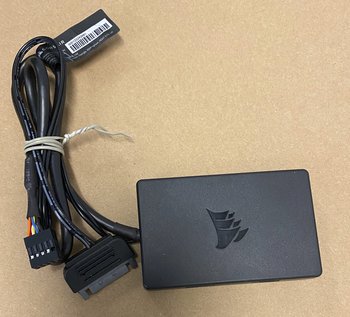
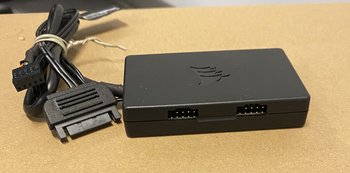
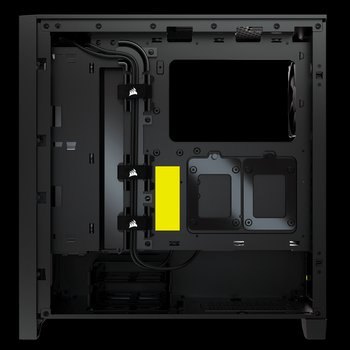
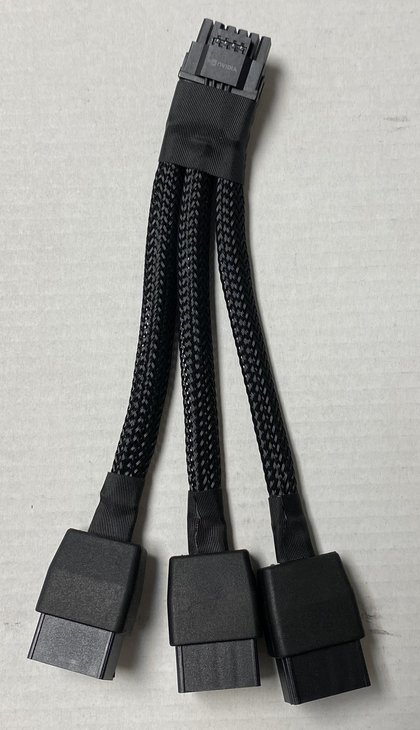
2. Install the Commander Core on the cable management side of the case, towards the left side of the case using the double-sided tape provided. This will allow room for you to connect the RGB cables from your fans. Grab the pump 24-pin cable and connect it to your Commander CORE. (Reference images below)
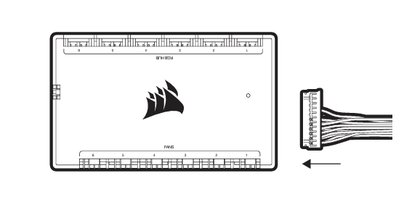

3. The 5000D RGB Airflow case has the three pre-installed RGB fans in the front of the case pre-connected to the RGB hub and fan power hub. These cables can remain connected by default. Connect the RGB cables for the top three radiator fans and the rear fan in sequential order into the Commander Core on the “RGB Hub” side.
4. Connect the Power Cables for the top three radiator fans and the rear fan in sequential order into the Commander Core on the “Fans” side.
Note: Fan RGB and Power Cables can be re-arranged based on customer preference.
* Refer to video for step-by-step instructions.
GRAPHICS CARD AND POWER SUPPLY INSTALLATION

3. Retrieve the cables from your Power Supply Box labeled 24-Pin Power Cable and SATA Power Cable.
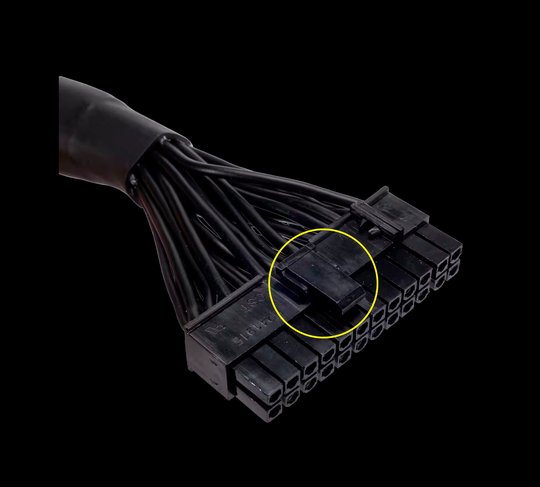
4. Connect the 24-Pin Power Cable into the motherboard (located on the right side) and route the cable towards the cable management side of the case. Confirm that the 24-Pin cable latch is secure over the 24-Pin header notch.
5. Connect the SATA Power from your AIO Liquid Cooling to the SATA Power Cable. Route the SATA power cable to the back side of the case. (If applicable).
6. Remove the second and third screws and backplates from the case. This is located on the rear side of the case. If you have a 3-slot graphics card, remove the second, third, and fourth screws and backplates.
7. Unpack and remove all packaging material and protective film from the graphics card before installation.
8. Install the graphics card on the first PCIe slot on the motherboard. Secure the graphics card with the case screws that were removed in step 1 of this section.

9. Grab the PCIe cable that may be pre-installed on your PSU, or retrieve the PCIe cable from your power supply box if it is a separate cable. Depending on the model of your graphics card, you may need two PCIe cables. Connect the PCIe cable to the graphics card and route the other end to the cable management side of the case. If your graphics card includes a power adapter, connect the adapter to the GPU, then connect the PCIe cable to the adapter.
PCle Cable
GPU Power Adapter
GPU Power Adapter
Note: GPU Power adapter will vary based on Build Kit chosen, and brand of GPU.
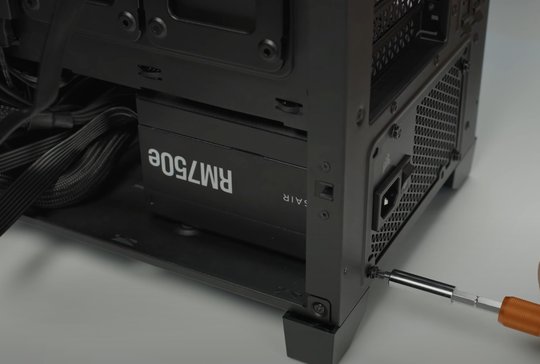
10. Retrieve the power supply and connect all the power supply cables that have been routed to the back side of the case.
ELITE PRO
PREMIUM
Note: Your PSU model/size will differ based on Build Kit chosen
11. Insert the power supply into the bottom section of the case on the back side and secure with the 4 screws provided. Make sure the PSU fan is facing down so it can pull cool, filtered air through the bottom cutout.


12. Connect and organize all remaining cables that have been routed to the back side of the case. Hide any excess cables you may have into the PSU chamber.
13. Retrieve the Front Panel and Filter, Tempered Glass Side Panel, Aluminum Side Panel, and Top Filter, and install them in their original locations.
* Refer to video for step-by-step instructions.
POWER ON
3. Connect your mouse and keyboard into the desktop via the USB ports on the motherboard located on the rear side of the case.
Note: Do not use the HDMI or Display Port located on the motherboard.

4. If you connect to your internet via an ethernet cable, proceed to connect the ethernet cable to the ethernet/LAN port on the motherboard. If you connect to your internet via Wi-Fi, you will be prompted to do so during the Windows account creation process.

5. Connect the power cable into the power supply and then connect the other end of the power cable to the nearest power outlet. If you are using a surge protector, connect the power cable to the surge protector instead.
6. Turn the power supply switch on and press the power button located on the top side of the desktop.

7. Once the system goes through the initial boot process, it will load the pre-installed Windows operating system.
8. Follow along the Windows prompts to complete the user account creation.
9. When you see the Windows home screen, open the search bar and type: Activation Settings, then hit Enter.
10. Locate and select the “Change Product Key”, then enter the Windows Activation key provided in the Corsair Build Kit.

11. Once Windows is activated, you can begin installing the drivers needed for your desktop PC. Located on the desktop, you will find a folder titled "Drivers - Open Me First". In this folder, you will locate the necessary drivers for your PC, Corsair Wallpapers, and the CORSAIR iCUE Software.
12. To install the drivers, double click each driver, one by one, and follow the prompts to complete installation. If prompted to restart, do so at that time, then continue the installation process.
Note: There is no need to use the included Windows Disc for activation as we have pre-installed the software on your boot drive.
13. It is recommended that you update your Windows as well to make sure that the PC has the latest Windows updates. To install the latest Windows updates, click on the search bar in your task bar, and type "Windows Updates", then hit Enter. When the "Windows Update" window opens, select the "Check for updates" button, or the "Download and Install Updates" button if Windows has already identified available updates.
* Refer to video for step-by-step instructions.
ACCESSING THE LASTEST UPDATES AND DOCUMENTATION
ACCESSING DRIVERS AND SOFTWARE
CORSAIR BUILD KIT has all the necessary drivers and software available in a folder located on the desktop for easy installation.
To control and customize the RGB components in your Build Kit, please visit https://www.corsair.com/us/en/icue to download the latest version of iCUE. Using the iCUE software, you can create customized lighting profiles for all the RGB components in your desktop.
You can also use iCUE to monitor system temperatures, set custom fan curves, and create RGB temperature alerts. When using CORSAIR peripherals, iCUE has built in features to calibrate your mouse and adjust DPI, record macros and remap keys and buttons, and fine-tune headset audio settings.

What do I do if I am missing a component from my Corsair Build Kit?
Thoroughly check the Corsair Build Kit box and ensure that you have received all your components by referencing the checklist provided on the Top Sheet. If you are missing a component, please contact Corsair Support at +1 (510) 350-3212.
Why doesn’t my CORSAIR BUILD KIT power on?
Verify that you have properly connected the power cable into the power supply and the wall power outlet. Next, verify that your power supply switch is turned on. If the problem continues, contact CORSAIR Support at +1 (510) 350-3212.
Why am I not receiving video on my monitor?
Check the rear side of your desktop and confirm that your HDMI or Display Cable is properly connected to your graphics card. Also confirm that the HDMI or Display Cable is connected in the correct HDMI or Display Port on your monitor. If the problem continues, contact CORSAIR Support.
How do I fix audio issues on my CORSAIR BUILD KIT?
Verify that you have the latest software and drivers installed for your system. If the problem persists, right-click the Audio Icon in your System Tray located at the bottom right corner of your desktop. Select “Troubleshoot sound problems” and follow the instructions. If the problem continues, contact CORSAIR Support.
How do I retrieve updated drivers for my CORSAIR BUILD KIT?
Windows periodically releases new drivers through Windows Updates. Confirm you have the latest updates by visiting Windows Update Settings. In your Windows search bar, type "Windows Update Settings" and verify Windows is up to date.
What do I do if CORSAIR iCUE RGB Game Integrations aren’t working in supported game?
Verify that iCUE is running and that the game integration is selected in iCUE. Enter iCUE settings by selecting the gear wheel, then select SOFTWARE and GAMES and make sure that the “Enable Game Integrations” switch is selected.
Why is my WiFi and/or Bluetooth not working?
First verify that you have attached the WI-FI antennas to the WI-FI card located at the rear side of the desktop. Then check available WI-FI networks being displayed in Windows. If you still are not able to use Wi-Fi and/or Bluetooth connectivity, contact CORSAIR customer support.
How do I enter System BIOS?
Press and hold the DEL key during system bootup sequence to enter the System BIOS. This should only be done by advanced users.
My hardware was damaged during the build process, what should I do?
Place the component back in its packaging and contact Corsair Support for further instructions.
COMPLIANCE STATEMENT
CORSAIR is committed to compliance with the laws and regulations in each country into which the company ships our products. CORSAIR products are designed and tested to meet the appropriate worldwide standards for Product Safety, Electromagnetic Compatibility, and other regulatory compulsory requirements when used for their intended purpose.
LIMITED PRODUCT WARRANTY
CORSAIR BUILD KIT comes with a 2-year hardware warranty for the original purchaser, starting from the day of purchase from an authorized CORSAIR reseller. CORSAIR warrants that the product will be free from defects in material and workmanship for a specified period commencing on the date of purchase. The warranty period will vary by specific product, as identified in your user documentation, on the product package, or as listed in the attached listing of CORSAIR Warranty Periods. In the event any of these warranty periods differ, the longest specified warranty period will apply.
Except where prohibited by applicable local law, this warranty is limited to the original purchaser and is non-transferable. To exercise your warranty rights, you must present a sales receipt and provide product serial number information. This warranty provides you with specific legal rights, and you may have additional rights that vary under local laws.
In general, this warranty means your CORSAIR hardware product will operate in accordance with published technical specifications, as specified by its data sheet, and in the operating environment for which it was intended for the length of the warranty period.
REMEDIES
CORSAIR’s entire liability and your exclusive remedy for CORSAIR BUILD KIT product that is not operating in accordance with its published technical specifications is at CORSAIR’s discretion to repair or replace the product at CORSAIR’s expense. This warranty obligation is conditioned upon the hardware being returned to the original place of purchase, or another place as directed by CORSAIR, with the original sales receipt attached. You may be required to pay shipping and handling charges, as well as any applicable tariffs, duties, taxes, or other fees. CORSAIR may, at its discretion, provide new or refurbished products. Any replaced CORSAIR BUILD KIT will be warranted for the remainder of the original warranty period or thirty (30) days, whichever is greater, or for the period of time required by local statute.
OBSOLETE OR DISCONTINUED PRODUCTS
An obsolete or discontinued product will be replaced with the same product if available. If CORSAIR is unable to replace your obsolete or discontinued CORSAIR BUILD KIT product with the same product, CORSAIR will replace the obsolete or discontinued CORSAIR BUILD KIT product, in its sole discretion, with a CORSAIR BUILD KIT product having similar function and capacity.
EXCLUSIONS
This warranty does not cover problems or damage resulting from, but not limited to, any of the following:
COPYRIGHT/LEGAL INFORMATION
© 2023 CORSAIR MEMORY, Inc. All rights reserved. CORSAIR and the sails logo are registered trademarks of CORSAIR in the United States and/or other countries. All other trademarks are the property of their respective owners. Product may vary slightly from those pictured.
LIMITATION OF LIABILITY
CORSAIR shall not be liable for any special, incidental, indirect, or consequential damages whatsoever, including but not limited to loss or profits, revenue, or data (whether direct or indirect) or commercial loss for breach of any express or implied warranty on your product even if CORSAIR has been advised previously of the possibility of such damages. Some local laws do not allow the exclusion or limitation of special, indirect, incidental, or consequential damages, so this limitation or exclusion may not apply in your jurisdiction.
ASUS WiFi Card: 75-004550
MSI WIFI Card: 75-004870
Intel WiFi Assembly Card: 75-005350
Contains FCC ID: PD9AX200NG
Contains IC: 1000M-AX200NG