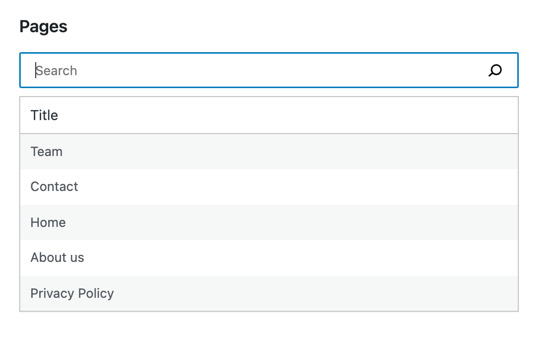
In this part, we will build a filterable list of all WordPress pages. This is what the app will look like at the end of this section:
Let’s see how we can get there step by step.
Step 1: Build the PagesList component
Let’s start by building a minimal React component to display the list of pages:
function MyFirstApp() {
    const pages = [{ id: 'mock', title: 'Sample page' }]
    return <PagesList pages={ pages }/>;
}

function PagesList( { pages } ) {
    return (
        <ul>
            { pages?.map( page => (
                <li key={ page.id }>
                    { page.title }
                </li>
            ) ) }
        </ul>
    );
}
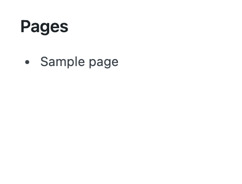
Note that this component does not fetch any data yet, only presents the hardcoded list of pages. When you refresh the page, you should see the following:
Step 2: Fetch the data
The hard-coded sample page isn’t very useful. We want to display your actual WordPress pages so let’s fetch the actual list of pages from the WordPress REST API.
Before we start, let’s confirm we actually have some pages to fetch. Within WPAdmin, Navigate to Pages using the sidebar menu and ensure it shows at least four or five Pages:

If it doesn’t, go ahead and create a few pages – you can use the same titles as on the screenshot above. Be sure to publish and not just save them.
Now that we have the data to work with, let’s dive into the code. We will take advantage of the @wordpress/core-data package which provides resolvers, selectors, and actions to work with the WordPress core API. @wordpress/core-data builds on top of the @wordpress/data package.
To fetch the list of pages, we will use the getEntityRecords selector. In broad strokes, it will issue the correct API request, cache the results, and return the list of the records we need. Here’s how to use it:
wp.data.select( 'core' ).getEntityRecords( 'postType', 'page' )
If you run that following snippet in your browser’s dev tools, you will see it returns null. Why? The pages are only requested by the getEntityRecords resolver after first running the selector. If you wait a moment and re-run it, it will return the list of all pages.
Note: To run this type of command directly make sure your browser is displaying an instance of the block editor (any page will do). Otherwise the select( 'core' ) function won’t be available, and you’ll get an error.
Similarly, the MyFirstApp component needs to re-run the selector once the data is available. That’s exactly what the useSelect hook does:
import { useSelect } from '@wordpress/data';
import { store as coreDataStore } from '@wordpress/core-data';

function MyFirstApp() {
    const pages = useSelect(
        select =>
            select( coreDataStore ).getEntityRecords( 'postType', 'page' ),
        []
    );
    // ...
}

function PagesList({ pages }) {
    // ...
    <li key={page.id}>
        {page.title.rendered}
    </li>
    // ...
}
Note that we use an import statement inside index.js. This enables the plugin to automatically load the dependencies using wp_enqueue_script. Any references to coreDataStore are compiled to the same wp.data reference we use in browser’s devtools.
useSelect takes two arguments: a callback and dependencies. In broad strokes, it re-runs the callback whenever either the dependencies or the underlying data store changes. You can learn more about useSelect in the data module documentation.
Putting it together, we get the following code:
import { useSelect } from '@wordpress/data';
import { store as coreDataStore } from '@wordpress/core-data';
import { decodeEntities } from '@wordpress/html-entities';

function MyFirstApp() {
    const pages = useSelect(
        select =>
            select( coreDataStore ).getEntityRecords( 'postType', 'page' ),
        []
    );
    return <PagesList pages={ pages }/>;
}

function PagesList( { pages } ) {
    return (
        <ul>
            { pages?.map( page => (
                <li key={ page.id }>
                    { decodeEntities( page.title.rendered ) }
                </li>
            ) ) }
        </ul>
    )
}
Note that post title may contain HTML entities like á, so we need to use the decodeEntities function to replace them with the symbols they represent like á.
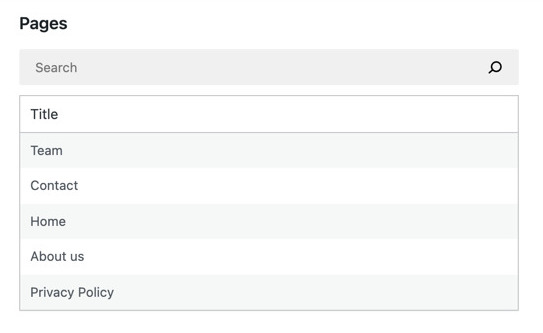
Refreshing the page should display a list similar to this one:

Step 3: Turn it into a table
function PagesList( { pages } ) {
    return (
        <table className="wp-list-table widefat fixed striped table-view-list">
            <thead>
                <tr>
                    <th>Title</th>
                </tr>
            </thead>
            <tbody>
                { pages?.map( page => (
                    <tr key={ page.id }>
                        <td>{ decodeEntities( page.title.rendered ) }</td>
                    </tr>
                ) ) }
            </tbody>
        </table>
    );
}

Step 4: Add a search box
The list of pages is short for now; however, the longer it grows, the harder it is to work with. WordPress admins typically solves this problem with a search box – let’s implement one too!
Let’s start by adding a search field:
import { useState } from 'react';
import { SearchControl } from '@wordpress/components';

function MyFirstApp() {
    const [searchTerm, setSearchTerm] = useState( '' );
    // ...
    return (
        <div>
            <SearchControl
                onChange={ setSearchTerm }
                value={ searchTerm }
            />
            {/* ... */ }
        </div>
    )
}
Note that instead of using an input tag, we took advantage of the SearchControl component. This is what it looks like:
The field starts empty, and the contents are stored in the searchTerm state value. If you aren’t familiar with the useState hook, you can learn more in React’s documentation.
We can now request only the pages matching the searchTerm.
After checking with the WordPress API documentation, we see that the /wp/v2/pages endpoint accepts a search query parameter and uses it to limit results to those matching a string. But how can we use it? We can pass custom query parameters as the third argument to getEntityRecords as below:
wp.data.select( 'core' ).getEntityRecords( 'postType', 'page', { search: 'home' } )
Running that snippet in your browser’s dev tools will trigger a request to /wp/v2/pages?search=home instead of just /wp/v2/pages.
Let’s mirror this in our useSelect call as follows:
import { useSelect } from '@wordpress/data';
import { store as coreDataStore } from '@wordpress/core-data';

function MyFirstApp() {
    // ...
    const { pages } = useSelect( select => {
        const query = {};
        if ( searchTerm ) {
            query.search = searchTerm;
        }
        return {
            pages: select( coreDataStore ).getEntityRecords( 'postType', 'page', query )
        }
    }, [searchTerm] );

    // ...
}
The searchTerm is now used as a search query parameter when provided. Note that searchTerm is also specified inside the list of useSelect dependencies to make sure getEntityRecords is re-run when the searchTerm changes.
Finally, here’s how MyFirstApp looks once we wire it all together:
import { useState } from 'react';
import { createRoot } from 'react-dom';
import { SearchControl } from '@wordpress/components';
import { useSelect } from '@wordpress/data';
import { store as coreDataStore } from '@wordpress/core-data';

function MyFirstApp() {
    const [searchTerm, setSearchTerm] = useState( '' );
    const pages = useSelect( select => {
        const query = {};
        if ( searchTerm ) {
            query.search = searchTerm;
        }
        return select( coreDataStore ).getEntityRecords( 'postType', 'page', query );
    }, [searchTerm] );

    return (
        <div>
            <SearchControl
                onChange={ setSearchTerm }
                value={ searchTerm }
            />
            <PagesList pages={ pages }/>
        </div>
    )
}
Voila! We can now filter the results:

Using core-data instead vs calling the API directly
Let’s take a pause for a moment to consider the downsides of an alternative approach we could have taken – working with the API directly. Imagine we sent the API requests directly:
import apiFetch from '@wordpress/api-fetch';
function MyFirstApp() {
    // ...
    const [pages, setPages] = useState( [] );
    useEffect( () => {
        const url = '/wp-json/wp/v2/pages?search=' + searchTerm;
        apiFetch( { url } )
            .then( setPages )
    }, [searchTerm] );
    // ...
}
Working outside of core-data, we would need to solve two problems here.
Firstly, out-of-order updates. Searching for „About” would trigger five API requests filtering for A, Ab, Abo, Abou, and About. These requests could finish in a different order than they started. It is possible that search=A would resolve after _ search=About_ and thus we’d display the wrong data.
Gutenberg data helps by handling the asynchronous part behind the scenes. useSelect remembers the most recent call and returns only the data we expect.
Secondly, every keystroke would trigger an API request. If you typed About, deleted it, and retyped it, it would issue 10 requests in total even though we could reuse the data.
Gutenberg data helps by caching the responses to API requests triggered by getEntityRecords() and reuses them on subsequent calls. This is especially important when other components rely on the same entity records.
All in all, the utilities built into core-data are designed to solve the typical problems so that you can focus on your application instead.
Step 5: Loading Indicator
There is one problem with our search feature. We can’t be quite sure whether it’s still searching or showing no results:
![]()
A few messages like Loading… or No results would clear it up. Let’s implement them! First, PagesList has to be aware of the current status:
import { SearchControl, Spinner } from '@wordpress/components';
function PagesList( { hasResolved, pages } ) {
    if ( !hasResolved ) {
        return <Spinner/>
    }
    if ( !pages?.length ) {
        return <div>No results</div>
    }
    // ...
}

function MyFirstApp() {
    // ...

    return (
        <div>
            // ...
            <PagesList hasResolved={ hasResolved } pages={ pages }/>
        </div>
    )
}
Note that instead of building a custom loading indicator, we took advantage of the Spinner component.
We still need to know whether the pages selector hasResolved or not. We can find out using the hasFinishedResolution selector:
wp.data.select('core').hasFinishedResolution( 'getEntityRecords', [ 'postType', 'page', { search: 'home' } ] )
It takes the name of the selector and the exact same arguments you passed to that selector and returns either true if the data was already loaded or false if we’re still waiting. Let’s add it to useSelect:
import { useSelect } from '@wordpress/data';
import { store as coreDataStore } from '@wordpress/core-data';

function MyFirstApp() {
    // ...
    const { pages, hasResolved } = useSelect( select => {
        // ...
        return {
            pages: select( coreDataStore ).getEntityRecords( 'postType', 'page', query ),
            hasResolved:
                select( coreDataStore ).hasFinishedResolution( 'getEntityRecords', ['postType', 'page', query] ),
        }
    }, [searchTerm] );

    // ...
}
There is just one last problem. It is easy to make a typo and end up passing different arguments to getEntityRecords and hasFinishedResolution. It is critical that they are identical. We can remove this risk by storing the arguments in a variable:
import { useSelect } from '@wordpress/data';
import { store as coreDataStore } from '@wordpress/core-data';
function MyFirstApp() {
    // ...
    const { pages, hasResolved } = useSelect( select => {
        // ...
        const selectorArgs = [ 'postType', 'page', query ];
        return {
            pages: select( coreDataStore ).getEntityRecords( ...selectorArgs ),
            hasResolved:
                select( coreDataStore ).hasFinishedResolution( 'getEntityRecords', selectorArgs ),
        }
    }, [searchTerm] );

    // ...
}
And voilà! That’s it.
Wiring it all together
All the pieces are in place, great! Here’s the complete JavaScript code of our app:
import { useState } from 'react';
import { createRoot } from 'react-dom';
import { SearchControl, Spinner } from '@wordpress/components';
import { useSelect } from '@wordpress/data';
import { store as coreDataStore } from '@wordpress/core-data';
import { decodeEntities } from '@wordpress/html-entities';

function MyFirstApp() {
    const [ searchTerm, setSearchTerm ] = useState( '' );
    const { pages, hasResolved } = useSelect(
        ( select ) => {
            const query = {};
            if ( searchTerm ) {
                query.search = searchTerm;
            }
            const selectorArgs = [ 'postType', 'page', query ];
            return {
                pages: select( coreDataStore ).getEntityRecords(
                    ...selectorArgs
                ),
                hasResolved: select( coreDataStore ).hasFinishedResolution(
                    'getEntityRecords',
                    selectorArgs
                ),
            };
        },
        [ searchTerm ]
    );

    return (
        <div>
            <SearchControl onChange={ setSearchTerm } value={ searchTerm } />
            <PagesList hasResolved={ hasResolved } pages={ pages } />
        </div>
    );
}

function PagesList( { hasResolved, pages } ) {
    if ( ! hasResolved ) {
        return <Spinner />;
    }
    if ( ! pages?.length ) {
        return <div>No results</div>;
    }

    return (
        <table className="wp-list-table widefat fixed striped table-view-list">
            <thead>
                <tr>
                    <td>Title</td>
                </tr>
            </thead>
            <tbody>
                { pages?.map( ( page ) => (
                    <tr key={ page.id }>
                        <td>{ decodeEntities( page.title.rendered ) }</td>
                    </tr>
                ) ) }
            </tbody>
        </table>
    );
}

const root = createRoot(
    document.querySelector( '#my-first-gutenberg-app' )
);
window.addEventListener(
    'load',
    function () {
        root.render(
            <MyFirstApp />
        );
    },
    false
);
All that’s left is to refresh the page and enjoy the brand new status indicator:


What’s next?
- Previous part: Setup
- Next part: Building an edit form
- (optional) Review the finished app in the block-development-examples repository